Monday, April 26, 2010

the real finished project

My Client was kind enough to send some photos of the Minuet with her table set up and cushions in place. Hopefully this will give a good sense of how all the textures and colors work well together. I am extremely pleased with how everything turned out.


Does anyone want a sneak peak into the Safari?

Do you remember the movie Alien? There was the scene with Sigorny trying to find the alien in the hulk of the destroyed ship. All the wires are hanging down...


well, that is how I feel in side of Rosie. No monsters in there though.


There are some failed Olympic rivets though. There are actually a number of these rivets. About 35% show signs of leakage. I have a friend that refers to Olympic rivets as single use clecos.


Rosie was hit once or twice and had three segments replaced. I will not be replacing the segments, but those single use clecos are getting replaced with real bucked rivets.


Even before Rosie left Jackson Center someone was having issues with her rivets.


Oh, yeah... Did I mention the frame? Got rust?

Saturday, April 24, 2010

Shift Change Rosie

There as been a change in the line up at Frank's Trailer Works.


The sweet little 1977 Argosy Minuet went home today with her owners. This has been yet another project of great pride. Her owners left very happy and should have many years of fun to come with her. A great deal happened in a short period of time. I hope you enjoy these before and after shots.


The carpet and fabric end panels on the gaucho were worn well.


So I made new side panels with a laminate that was used for the table top and the fridge panel also. The yellow Marmolium warms up the area real nicely. When the cushions were installed by the client, I did not have the sense to snap a shot. I will have to take one at the next rally. Everything tied together really well.


The bathroom floor was sheet vinyl like in my first apartment.


Did I mention how the Marmolium makes the space glow?


Not be redundant and show the picture twice, but with out the table top...

... and with


This was a real fun project to work on. Having an excited client really added to the momentum of the job. All the structure was checked and straightened out.


All the systems were gone over and made 100%.


She is ready for many years of camping to come.


I am very pleased with how it all came out.


And next up is Rosie.


Rosie is a 1973 23' Safari. Rosie has a fairly well documented past.


She will be a shell off floor replacement. There will be plenty of frame repairs for the welding lovers. We will see some excellent pattern making for all those interested in how to duplicate the rotten floor and assure that the curves are copied exactly. And to stir everyones dander, another axle swap.
This project should have a little for everyone to enjoy, unless Airstream restorations bore you. Hopefully if they do, you have stopped reading by now.

Tuesday, April 13, 2010

Serious design flaw


I always heard Argosy were the test bed for Airstream. I would say not all experiments were successful. My client gave me an extensive list of things they wanted done. The list was a guide, but the emphasis was to take care of the important structural parts first. One of the things not on the list, that I felt important was to tighten up the belly. It was sagging in a few spots ad I added it to the list to pull it up so it would not continue to fall. When I tried to drill into a cross member, I discovered that it moved.


The cross member moved so much, that I pulled it right out.


Here is where the test bed failed. The entire cross member is held in with a 1 5/8" long weld on each side. As far as gauge of metal, I cannot tell you. It is however less than 1/8" thick. The metal snapped right on the weld line. I understand light weight, but I also understand strong. What were they thinking? This was built in 1977, and we had not become a disposable society by then had we?


Not once but twice did this failure occur. The second one was just behind the axle. No wonder there was so much sag in the belly pan.


Another issue I take in the design is how far the span is between cross members. Four feet is the distance between them. In an Airstream with plywood floor the span is two feet. The amount of weight a few extra cross members would have required would not have broken the scale. Over thinking the light weight aspect caused a serious failure in my opinion. The new cross members are being fabricated out of new steel. I could have welded the old ones back in, but I feel the structure is terribly under served. I am adding a little weight in, but feel the gain in strength is worth it. With all this metal exposed, I will be painting the frame too.


All the belly pan was dropped to inspect all the frame. One reaches a point that it only makes sense to know it is all in good shape. This is the rear. Rain water getting in the bumper hatch has been puddling in the nasty old insulation. I can only imagine the things living in that soup.


It may sound like I have been ripping hard on the engineers at Argosy. I was and they deserve it. I will however compliment them on the floor. I think this is very innovative and wish it had continued. They made a sandwich of 1/8" aluminum and foam. Many who walk in an Argosy with this type of floor do not like the give it has. I do not think it would be an issue if the engineers had just used more cross members to keep it rigid.

Thursday, April 8, 2010

Fessing Up

I was very wrong about Henchen Axles. The debate over who makes the right axle, the best axle, the proper axle has raged in the Airstream community. Nothing stirs up the people like axles do. I present all the options and my clients make the call. The owner of the Minuet chose to go with Henchen brand. I am going to tell you all, I was wrong in thinking there was no difference. I am sold and I will tell you why.
One side of the axle was actually in an upward tilt. Even with all the weight off of it, it still remained in an upward angle. How much shock absorption could that be offering?
The other side was level. Once again, how much shock control is that providing? Zero... and see that shock? looks kind of new if you ask me. I think someone is pulling a little cheap fix to a bad situation. Folks, seriously now... cheap fixes never work.

I want to be VERY honest about how this swap went. Hopefully my experience will benefit others. I began by loosening the lug nuts. I proceeded to jack the trailer up, put jack stands under her disconnect the brake wires, and cut the bolts off. I tried for a while to use heat and oil, but gave up after 30 minutes. I pulled out the sawzall and cut the bolts off. 2:08 total time to remove the old axle and have a clean slate to work from.

Here is the new axle. It took exactly four weeks to the day from placing the order till it showed up. Side by side it is identical to the original. The only difference is that it is 3500# instead of the original 3200#.

It took me 21 minutes to have the axle up into place, bolted in, checked for parallel, and the shocks mounted. The next 27 minutes were spent wiring the brakes. The leads on the backing plate could have been a little longer. I had to put a jumper in to connect everything. All the crimps slowed me down. Yes, it took me longer to do the wiring than to mount the axle. Total swap time, 2:56. No drilling, no struggling, no issues at all(except the leads being a little short).

Another task that took place required a little too much effort in removing the old item. This original vent did not want to come off. The multiple layers of sealant and caulk made an adventure of just finding the rivets. Persistence and one rivet at a time got it removed.


And now the hole is filled with a top of the line remote controlled with rain sensor and thermostat controlled Fantastic Fan. I had a slight issue with a contact and Larry at Fantastic walked me right through it. Excellent customer service at Fantastic Fan.


Marmolium floor was installed.


Front to back...


Back to front.


And a new catalytic heater to round it all off.

I will make sure and show a before and after of how the new axle lifted the whole trailer a few inches in my next post.

Thursday, March 25, 2010

Shift Change


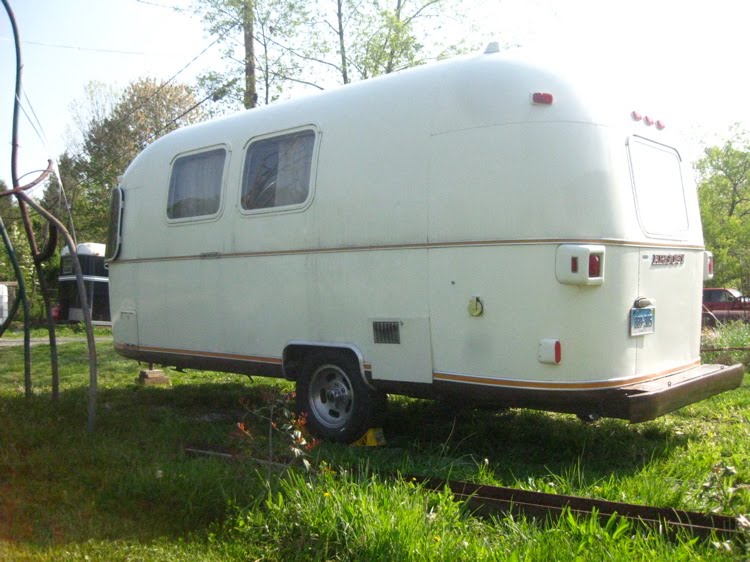
A new lady has slid into the hot seat at Frank's Trailer Works. I would love to tell you her name but her owners have not chosen one yet. Maybe they don't believe in that kind of thing. Not really sure, but she is a sweet little trailer. At 20 feet maybe I should say sweet normal sized girl. You are looking at a 1977 Argosy Minuet. Argosy was the test bed for Airstream and this one fits that mold for sure. The floor is aluminum and all the cabinets are vinyl wrapped metal.


I have a running list of things to accomplish. The main items are axle replacement, making sure the frame is in good shape, cat heater installation, new Fantastic Fan, and a bunch of other small projects.


I began with removing the sheet vinyl and the carpet to expose the sub floor.


The aluminum floor is a really cool idea. The only thing I do not like is that there is some sag between the cross members. I will be laying Marmolium over this and am very concerned about the cross members telegraphing through the flooring.


Remember the universal rule of Airstreams? They all leak, yes they all certainly do. There were some minor drips noted by the client and I was already planning to deal with that, but this leak is in a different area and needs to be stopped.


Here is where the leak is we knew about. The curb on the refer vent has a clear and defined gap. The upper shroud looks like it has been dealt with before too.


I see a lot of this on the seams. It is very easy for water to go in that gap. Once a little finds it way through it continues to pull more in with it. "Capillary Action" for all you cool folks not paying attention in sixth grade science.


The sun was blazing so forgive my photo quality... for demonstration purposes only...
That is a missing rivet. "So?", you say, "a missing rivet? Big deal..." Well, everyone talks about how Airstreams are the top of the heap. But here we have a clear example of how the quality control is not always in control. The top sheet was drilled out on a line punch. But the hole on the lower sheet was not drilled. When they bucked the sheets together they just left it empty. After 32 years someone has finally gotten out a drill and riveted the sheets together as they should had been in the first place. Lots of sealant was injected up between the sheets and now they are flat and together.


I know I will get a bunch of questions about this product so I will try and answer as many as possible before hand....
I sealed all the obvious leak spots using the same product Airstream does in their service center. This can be purchased online through the Airstream Store. The pump dispenser squeezes out a fine bead. The material is drawn into the seam as it begins to cure. This is actually fun to watch happen. From what I understand the product can be used on up to 1/4" wide gaps. The sealer is kind of clear with a silver dust in it. It has a silver cast when it dries too. The pump takes a good deal of practice to get a real smooth bead so start up high and work your way down into eye sight. By the time you get to eye level you will be a pro.


Well with the holes hopefully sealed I turned my attention back to the new flooring. In order to even out some of the sags and humps I put down a padding made for floating floors.


Next I hope to remove the old roof vent and install a Fantastic Fan. Lots of things going on so check back often.

Saturday, March 20, 2010

When will I be done?


I will be done when I am finished, that is when. And why I say that, I will explain.


I have certain superstitions that effect me. For instance, I never put away a tool until the job is done. As soon as I put it away, I will need it. Keeping it out and ready usually assures I will not need it. Another superstition is to never say it is done until I am sure it really is. I broke that rule by calling Lu Lu done in a previous post. I hooked her up and got ready to tow her over to the yard so I can get working on my next job. I pulled out on the street and stopped to check the lights. NO LIGHTS. NO BRAKES. NO NOTHING. What does one do? Well, I tried wiggling the plug, for it must not be making good contact with the pins. By doing this I was able to get the green light to light up on the brake controller. Yeah, success! But when I put on the signals the brake controller flashed red. When the brake are applied... RED. The controller owners manual says, "open ground" I wiggle again and feel a distinct "POP".


By inspecting the connector I notice that the screw that clamps down on the cable is gone allowing the cord to spin around in the connector. The set screw that holds it together is also screwed in so far that no threads are actually holding in the main body of the connector either. I open it up to find...


that a great deal of water has been having a good old time with the brass and copper in the plug.


But this is the shocking part... literally. The white wire is loose and with just a little flex of the cord, it is touching the black. No wonder I blew a fuse, everyone knows to never touch a white wire to a black one. A run over to the RV store, a little rewiring, and we are back in business. A side note: Not all seven pins are wired the same. Some are set up differently than the standard pattern. Put it back the way you found it, unless you want to rewire the tow vehicle too.


So, Lu Lu is most likely done now. She is over at the storage yard and her owners will be down next week to pick her up. They will be doing some polishing, some seam sealing, and some much needed window reglazing. I am very happy with how I made that giant rip in the skin go away.

This brings me to another delay in getting her done. A number of you read my other blog. Some might remember a year ago when I got some metal stuck in my eye. I had to have it removed surgically. Ringing any bells? Well, the next trailer, and the one after that need new axles.


In order to order axles one needs some very important measurements (unless you go the route we ended up going, but more on that later). One needs frame rail to frame rail dimension and the distance from hub face to hub face. To obtain these measurements you need to jack the trailer up and remove one of the wheels. While crawling under to measure frame rail to frame rail my shoulder brushed the frame. Some of that rust on the frame rubbed off and fell right between my safety glasses and my eye. I flushed my eyes out right away and went back to work. However, while driving home I could feel a burning in my eye. Sure enough, I had another piece of metal stuck in my eye ball. If this ever happens to you, make sure to seek treatment right away. The eye contains proteins and enzymes that oxidize metal very quickly. Removing the object is easy but the rust left behind requires surgery. Having been through it twice now, I can tell you it is no fun having your eye drilled to remove the rust. Three days later it still feels very uncomfortable and the sensitivity to sun light is extreme.
WEAR THOSE DAMN SAFETY GLASSES(even if they fail to protect your eyes some times)


But with all of that said... NEXT!!!!!
Folks this is my next project. You are looking at a very well cared for 1977 Argosy Minuet. She is 20 feet long and in very nice shape. There is no structural work slated for this project however I will be peeking in and making sure everything is looking alright. The scope of work includes a new axle, fantastic fan, new cat heater, flooring installed, and a number of little projects if time and budget permit. Her owners are very nice people that are very proud of their new Airstream. They are excited to get her out and do some serious camping this season.