Thursday, December 26, 2013

The British Import vs The American Icon(revised)


I am a firm believer in honesty. In my first post about Abby I stated that she was her owners first trailer. That was not true. The trailer above is their first trailer. They love both trailers equally like a parent does their kids. I just wanted to correct my error. I also wanted to repost one of my favorite photos from my photo library.

Wednesday, December 25, 2013

The British Import vs The American Icon (Revisited)


I think it only fair to show both sides of a story. In my last post, I told you about the MGB that lost it's brakes while out for a Sunday drive. Here is that canary yellow British import that took on the American Icon.


I am not sure why, but I do not think it will be put back together again. I imagine it was deemed "total loss". I can only hope someone loved it enough to put it back together again.


Tuesday, December 24, 2013

The British Import vs. The American Icon


I received a call. The call came with a frazzled, worried voice. "I think it is really bad… We got broad sided by a vintage MGB. The door is totally messed up and a rib or two is bent badly" 


Abby is a 1973 Argosy 26. Her owners lovingly renovated her a few years ago and as any trailer owner knows, your first trailer is very dear to you.


A canary yellow MGB, out for a Sunday drive, lost it's brakes and Abby stopped it. 


The door frame took the brunt of the blow. It was indeed seriously bent. I was optimistic when looking at the photos, but once I saw it in person I knew there was no fixing that door. The entire door frame was twisted. Even though I generally remain positive about these things, I knew it was finished.


Right at the wheel well there was also this very large tear and a bent rib. Her owners told me they had faith in me and left Abby in my hands. I might also add that before they brought her down, they made my life very easy by removing all the interior furniture and interior skins in the area.

I hatched a plan; Plan A, new door. New door from a California Airstream parts supplier, $2200+ shipping. 
I hatched another plan; Plan B, Salvaged door. And to my luck, it took about 2 hours to find one. 


Star Trailer Works in El Paso Texas had a door out of a 1976 Airstream on Ebay. Would a 76 Airstream door work in a 73 Argosy? One other issue, I needed the frame too. I contacted Mike and asked him if when I won the auction, could I also purchase the frame. Mike was more than willing to work with me. He offered to end the auction early but I just did not like doing that since he had bids. I set my bid and crossed my fingers. I think you know how it turned out...


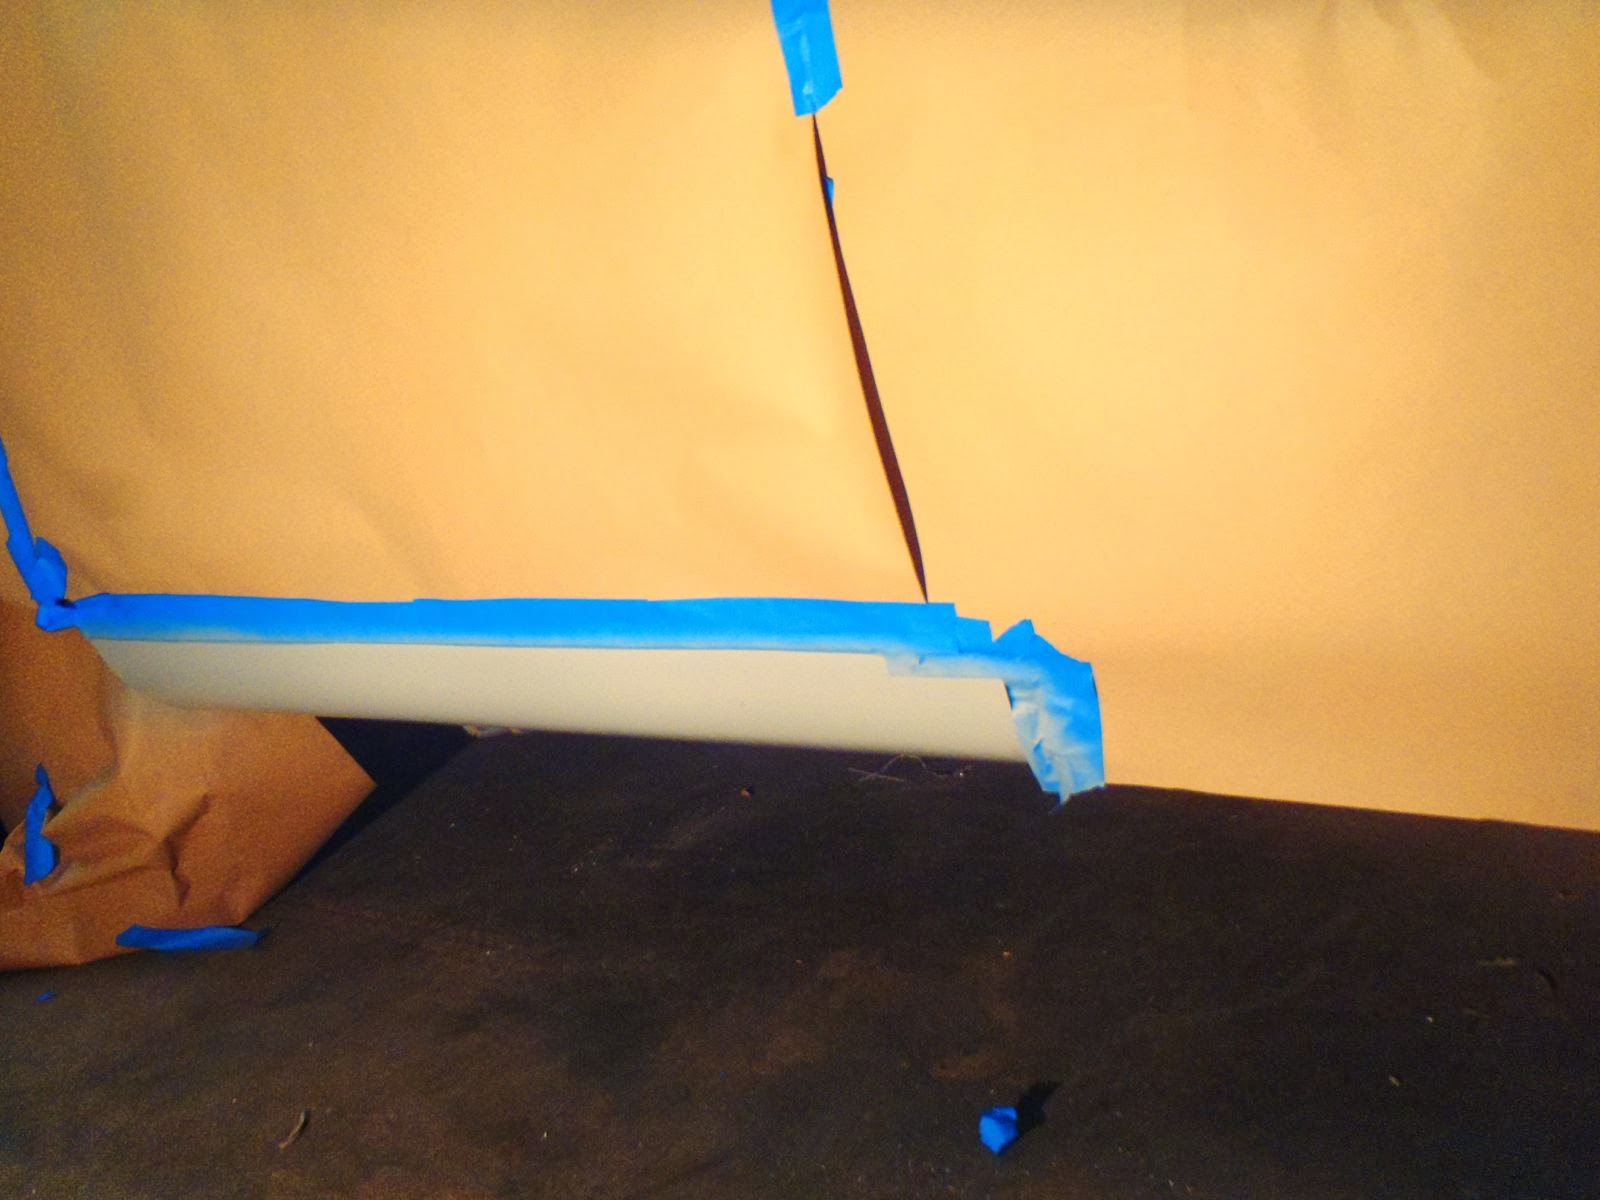
The damaged panel and door frame were removed from the trailer.


The three bent ribs were then straightened back out. Two of them were fairly easy but one wanted to make it a challenge. I like challenges. 


A new sheet of Alclad was then fitted into the side.


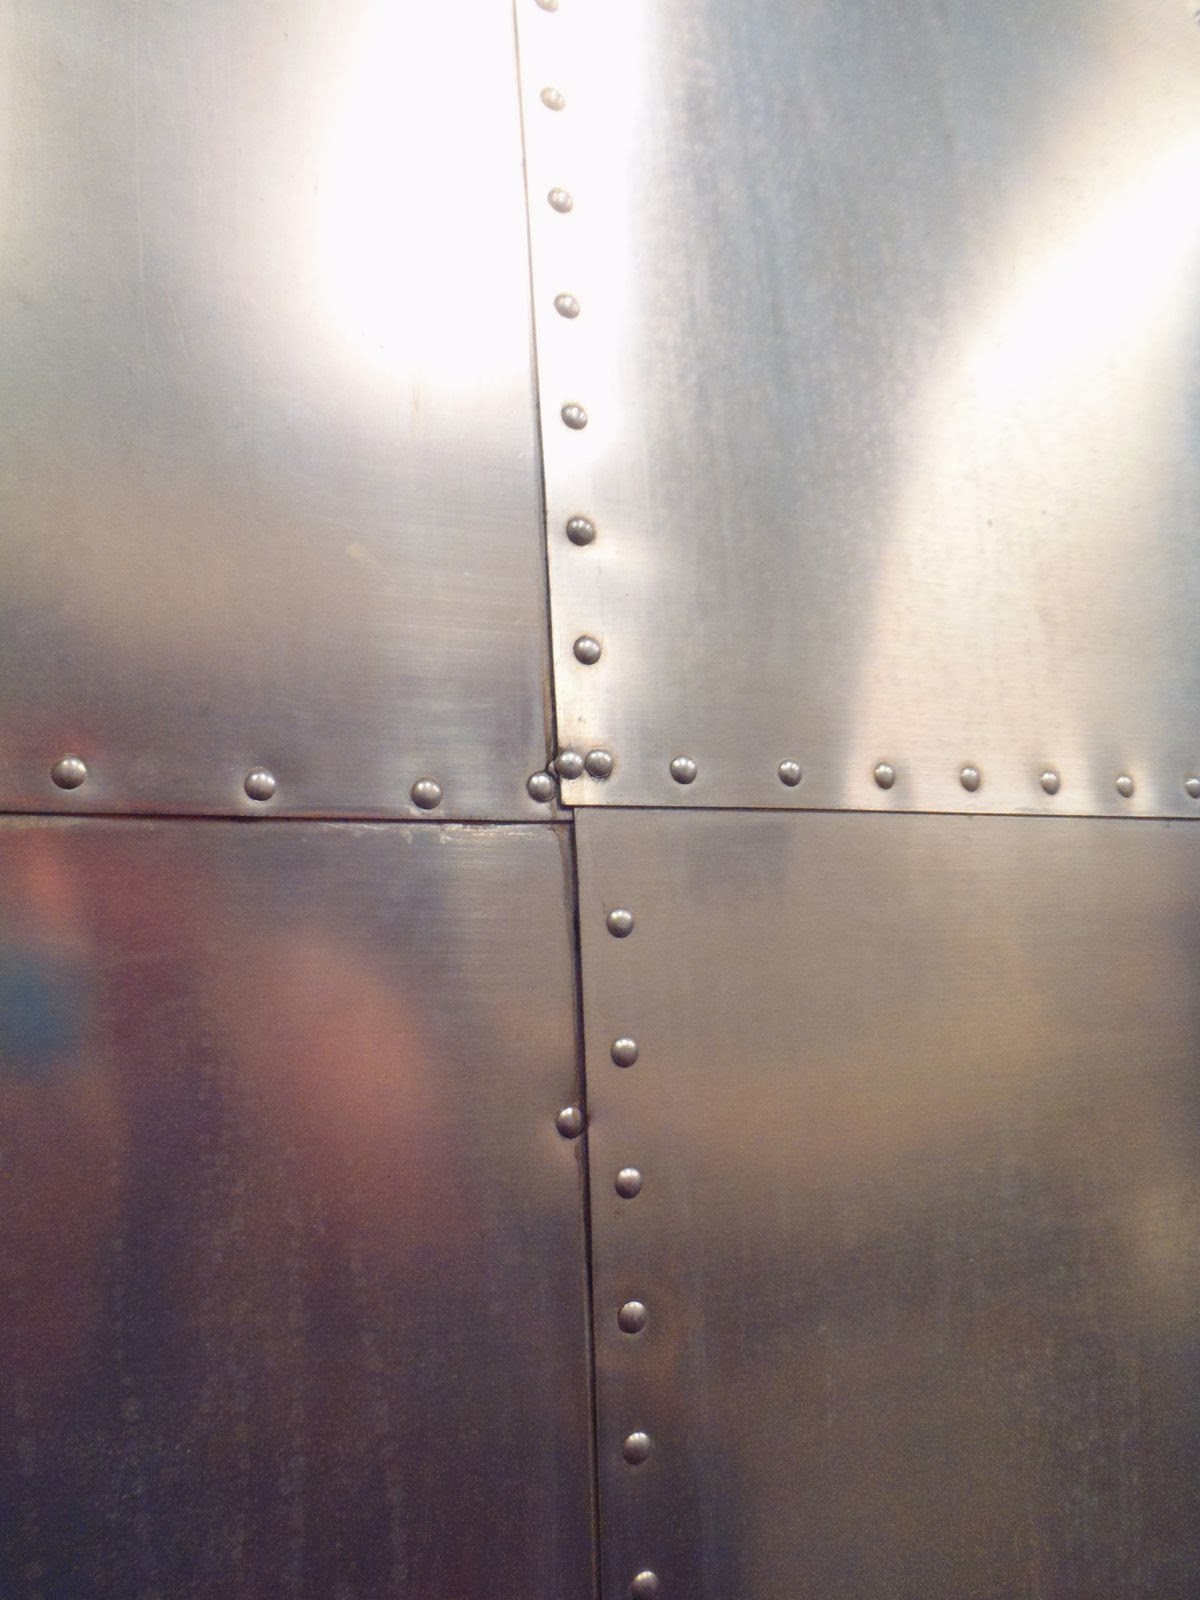
At the moment of truth, it was serendipity. These frames must have had every other hole drilled during manufacturing, because those lined up exactly. During installation they must have free handed the holes in between because none of them lined up.  Keep in mind, 1976 Airstream door going into a 1973 Argosy. 


The Airstream gods were smiling on me.


All dry fitted, drilled for solid rivets, and ready to be put together for ever.


A new overlay panel was also made to cover the caved in belly pan.


An absolutely perfect fit. Sorry to blow my own horn, but I am very proud of pulling this off. Next I took it all apart and applied copious amounts of trempro 626 where needed.


That is great squeeze out.


Next all the rivets were bucket into place. 


Abby's owners had her painted from the belt line up to match their tow vehicle. I had to match the paint that was matched. Any paint jobs require excellent preparation because everyone knows the job only looks as good as the preparation . Aluminum requires extra special preparation. I used an etching aluminum primer.


The belly area got the same treatment.


Three, thin, coats of a single stage paint were then applied. When I say single stage that refers to a paint that has the base color and the clear coat all in one. It was my guess that whoever painted the trailer used that system. Most cars are painted in two stages, a base coat then a clear on top of that. It gives a really deep finish. With something so large I thought one pass was all the painter would have done. I wanted the paint to match so I went with the single stage.


There you have a really close match. When Abby goes home her owners plan to replace all the orange belt line with new material. The new panel will require very little work to polish up. The door will require a little more.


The last thing needed was new wheel well trim. Like icing on a cake, it just finishes it all off. An exterior electrical outlet was also installed just forward  of the wheels so that outdoor entertaining would be made easier.

Sunday, December 8, 2013

1968 Caravel 7 of...


Work progresses, though as in my last post, there is very little to see dramatically. The shell is now completely put back together again. 


The  replacing of the belt line is always the last step in making the shell complete. The next priority is to make the shell completely water tight. My main focus has been the windows. Anyone owning a 1966- 1968 Airstream knows the windows are a very vulnerable part. They are notorious for leaking.  I began the process by removing all of the gaskets and all the sealant used in the past.


Do you see that glow in the center of the photo? If you can see light from the inside you for sure will see water from the outside. This is serious issue with this era of trailer. All 4 corners on all 5 windows have this issue. The engineers were really relying on sealant to make the shell water tight. 


I have gone over this a few times now but originally the bumper hatch went under the sub floor. Once the sealant fails here the water goes under the floor and quickly rots it out. I have yet to see a trailer with a bumper hatch that does not suffer this issue. I redesign the lid so there is a gap between the shell and the hatch so the water cannot go under the floor.


These new hatches always look great in my opinion.


Here you see the window shown earlier with new gaskets installed. This gasket is crucial since it is all that keeps the weather out. The upper corners take the most abuse and must be supple. I strongly advise you replace the window gasket every few years in any 1966- 1968 Airstream. Putting a bunch of goo around the window is not going to fix it. If that goo makes contact with the gasket, it will actually keep the gasket from sealing on the glass and make the leak even worse.


You might also notice all the black lines on the shell interior. I have applied a spray on, flexible, sealer to every single rivet tail and every seam. The objective is zero leaks going forward. Special attention was given to the corners shown earlier. All the exterior seams have also been sealed using Acryl- R. This flexible seam sealant is very familiar to most reading my blog. Acryl-R wicks into the seam and remains flexible for a long time. The shell is almost ready to be tested under the hose...

Saturday, November 16, 2013

1968 Caravel 6 of...


Progress continues. I wish I had more to show you, but durning this phase of getting the shell leak free and sealed, you see very little day to day progress. Things are just not visually dramatic right now... 
The new belly pan sections were re installed. I do not have a photo that is not blurry, but all the belly is completed and the belt line has even been riveted back on. She can roll now if needed.


This trailer's owner has been lending a hand, a couple of days a week. Instead of paying me to do it, he has been doing the real ugly dirty stuff. Previously, he cleaned years of grime and mold off of all the interior skins. Lately his attentions have turned to helping me get a water tight shell. This trailer has multiple layers of various sealants applied over and over in an attempt to get the seams sealed. There is painters caulk, white silicone, clear silicone, blue gasket sealant, Parbond, and the original sealant, Vulkem. The approach was to just keep piling it on instead of removing the old garbage and sealing it properly. This is one of those situations where I say to myself; "They thought they were doing the right thing."


Dramatic results. This took a combination of methods which I will explain shortly.


I will use this photo as an example of how the old sealants were removed. Above you see the open for the tail light assembly. There are four sealants in this image. There was first some Vulkem used. It was applied at the factory when the tail lights were installed. It was an epic fail as I will point out later. Someone then applied Parbond. I am not a fan of Parbond. It gets rather hard over time and like the Vulkem, is very stubborn to remove. On top of those two, white painters caulk was applied. This is the easiest sealant to remove. On top of all that goodness, copious amounts of clear silicone was applied. It still leaked because nothing after the Vulkem has a good surface to bond to. It must all be cleaned off and the surface made spotless for the new sealant can be applied and more importantly, to bond.


So here is what I did;
I first rubbed briskly, with a wooden stick to remove all the "stuff" that would come off using just friction.
Next, MEK was applied with a squeeze bottle to the sealant line. I use a rag to catch the dribble. (NOTE: MEK is a very strong solvent. You should wear a respirator and gloves. It is one of those listed in California as a cancer causer. It is. It is super strong stuff. I have done my duty by giving you a safety lesson) I let the MEK set for a few minutes. When all signs of moisture are gone, it has set long enough.  I then repeat. 
Next I use the wooden scraper to rub all the "stuff" off.  Everything but the Vulkem and Parbond usually has come off at this point. 


I break out the heat...


... and more scraping with a wood stick. Why wood? Glad you asked. Wood does not (easily) scratch the aluminum. It will, when too much sealant builds on the edge of the stick. In that original sealant is aluminum from the construction of the trailer. Not a lot, but some. 
After the bulk of the Vulkem and Parbond has been scraped off, you can clean the rest with MEK. It dissolves it, so clean your rag often. 


Eventually, with persistence, sweat, profanity, and a little blood letting for good measure, the old stuff will be all gone.
On seams there is one more step; I use a dental pick to reach in and pull as much old sealant from the seam as I can get. BE CAREFUL WITH METAL ON METAL.


I want to talk about these tail light assemblies. 1968 was the first year for this new tail light assembles. I do not think it was thought through very well. The cast assembly has very little surface area and relies on it since it was surface mounted. When they were cut out for, the worker got very close to the edge on both of them. This is destine to fail in an epic manor. If you own a 1968, or any trailer using these type of tail lights, I strongly suggest you take a close look at this spot. The original sealand was not put between the surfaces, it was applied around the unit hoping to keep the water out.


You can see where the water flowed in over the years. 


I like to dry fit everything. I can make adjustments this way before it is locked in with rivets. The edge was marked on the skin so when the new Vulkem is applied, I can be sure to get right to the edge. After all the skin under the assembly had copious amounts of Vulkem applied right to the edge, it was cleckoed in and them actually riveted.


The assembly requires a bead of sealant on the outside, so I taped it off right to the original sealant line. A smooth bead was created using my finger and then the tape pealed back. The came out very well and within the assembly, the skin is completely covered with Vulkem. 
Next post I will be sure to have some good shots of how this area came out and how the belt line looks all put back in place.


Saturday, November 2, 2013

1968 Caravel 5 of...


TOUCH DOWN!!! Well, kind of. I put the shell back into place. It is always a momentous occasion. I always breath a big sigh of relief once it happens.


Everything went right back where it was supposed to. It took a little shoving and pushing, but it all went right back from where it started. I continued the bolting of all the parts back down. Not all the C channel was able to be accurately referenced before the shell was put back into place, so I opted to cleco it to the shell and lower it all back down together. 


Wally Byam always said, "make no changes, only improvements." I take that fairly seriously and strive to do just that. 
I use a slightly hybrid method of bolting everything back in place. First, on the right is the elevator bolt. It has a head twice as wide as the original bolts used. This gives a great deal of holding power over the board.  It also has a square shank which grabs the wood and keeps it from spinning while it is tightened. Center you see a bonded washer, front and back. I use these so no ferrous metal makes contact with the aluminum. It acts as a barrier and also helps distribute the force of the locking nut on the far left. I like these nuts since they do not back off once tightened down. I still bend over the excess shaft of the bolt to keep it from backing off just as Airstream did back in the day.


Next I went on to fabricate new bell pans. The old stuff is just too torn up and corroded to be used for anything but templates. The first step is to make sure all the rivets, screws, and blobs of putty are removed. Next I  flatten everything out with a body hammer. I next carefully trace the original making sure to copy everything exactly as it is. I want to point out the obvious since obvious is not always clear to everyone; The new aluminum is face down and so is the original or visa versa. This is a VERY common mistake made by many. Those tabs you see standing up are also very important in how much cut and angle there is. COPY means to make an exact replica. Close is not going to make it at this step.


That slit to the right. CRUCIAL. It allows the belly to curve upward to the outside of the frame rail and the center section to stay put. 


Here are the rear and front corners. Unlike earlier years, the guys at Airstream made these in smaller pieces. Previously, these were all part of the main belly sheet previously. This makes it a lot easier to install. 


I hope you enjoyed this little progress report. There will be more to come next week.