Thursday, August 26, 2010

Sixty-Four Double Door


I am so happy to be able to finally go public with this newest project. Not only will you be able to read about my progress here on this blog, but you can also listen to the commentary on a revamped Restoration Update segment on The Vintage Airstream Podcast. I cannot promise this will be as good as The Ambassador Update that Tim Shephard did, but I sure will give it my very best. So with no more a do, I want to present, The Sixty-Four Double Door.


I know, you are saying "Frank, it only has one door..." or "Frank the Factory never built a double door trailer in 1964..." On both accounts you are absolutely correct. This 1964 Sovereign only has one door at present, but when the project is finished, it will have two doors. It will also be re badged with "of the Road." This is sure to be a very interesting project for anyone curious about a complete restoration/ customization from the axles all the way through. The final product is going to have the look of a factory original, but have many modern conveniences. There will be no real changes, just a series of improvements made to make this trailer function better for my client Bruce.


Bruce gave me a hand by removing all the furniture from the walls. It came to me in a jumble stuffed inside the trailer. I was going to try and offer up some of the furniture to other people working on their own trailers, but once I took a good survey of the wood work, it was destine for the dump. The condition of things was horrible. The wood was moldy, damaged by water, and worst of all, URINE SOAKED. Yes, I had to say it. I know the VAP is a family show and I will be very good about not using too much adult language, but URINE SOAKED is the proper description.


I wadded in and began salvaging what could be reused by others or in future projects.


Everything was reduced down to a full size pickup bed of debris. The guy at the dump gave a step back when he smelled this load.


Once everything was out, I got a real good look at the floor. At some point, an owner had nailed plywood over the rotting floor. In some areas, the top layer is beginning to rot also. Most of all the perimeter is rotted.


The rear end is totally gone.


All the way around there is nothing but black, soft rotting plywood. The smell is a rather unbelievable blend of mold, rotting wood, and mouse urine. My kids even tell me how bad I smell at the end of the day.


That smell has got to go, so out come all the skins followed by all the insulation. It looks like a mouse hotel in there. I think this was an apartment unit for them. Everywhere in the insulation there is evidence of their occupying the space.


But not only where the mice at work, but so was water. Many serious leaks have been allowed to go on for many years. The windows on these 64's have a little design flaw that allows for water to seep in with every rain if not monitored. I will address windows in a future segment.


All the interior panels were carefully drilled off and engraved with their location on the backside.


With so many coats of paint on them, they will need to be stripped before new zolatone can be applied. I want to make sure I know where they go when reinstalling them.


With all the insulation gone, the smell was remarkably better. Once I power washed the entire thing with a serious disinfectant, it was almost odor free, well, sort of. There was still the rotting plywood and the URINE SOAKED insulation under the floor.


The space seems so vast with everything out of her. So much potential here, a total blank slate. The next step is to get the shell off of the chassis. My biggest concern is that when I remove the "C" channel from the deck, that too much wood will be missing and I do not want to have to extrapolate the curves or any element when putting down a new floor. I felt it best to template the channel. By creating a clear map of where all the channel sits at present, I will know where to put it in the future.


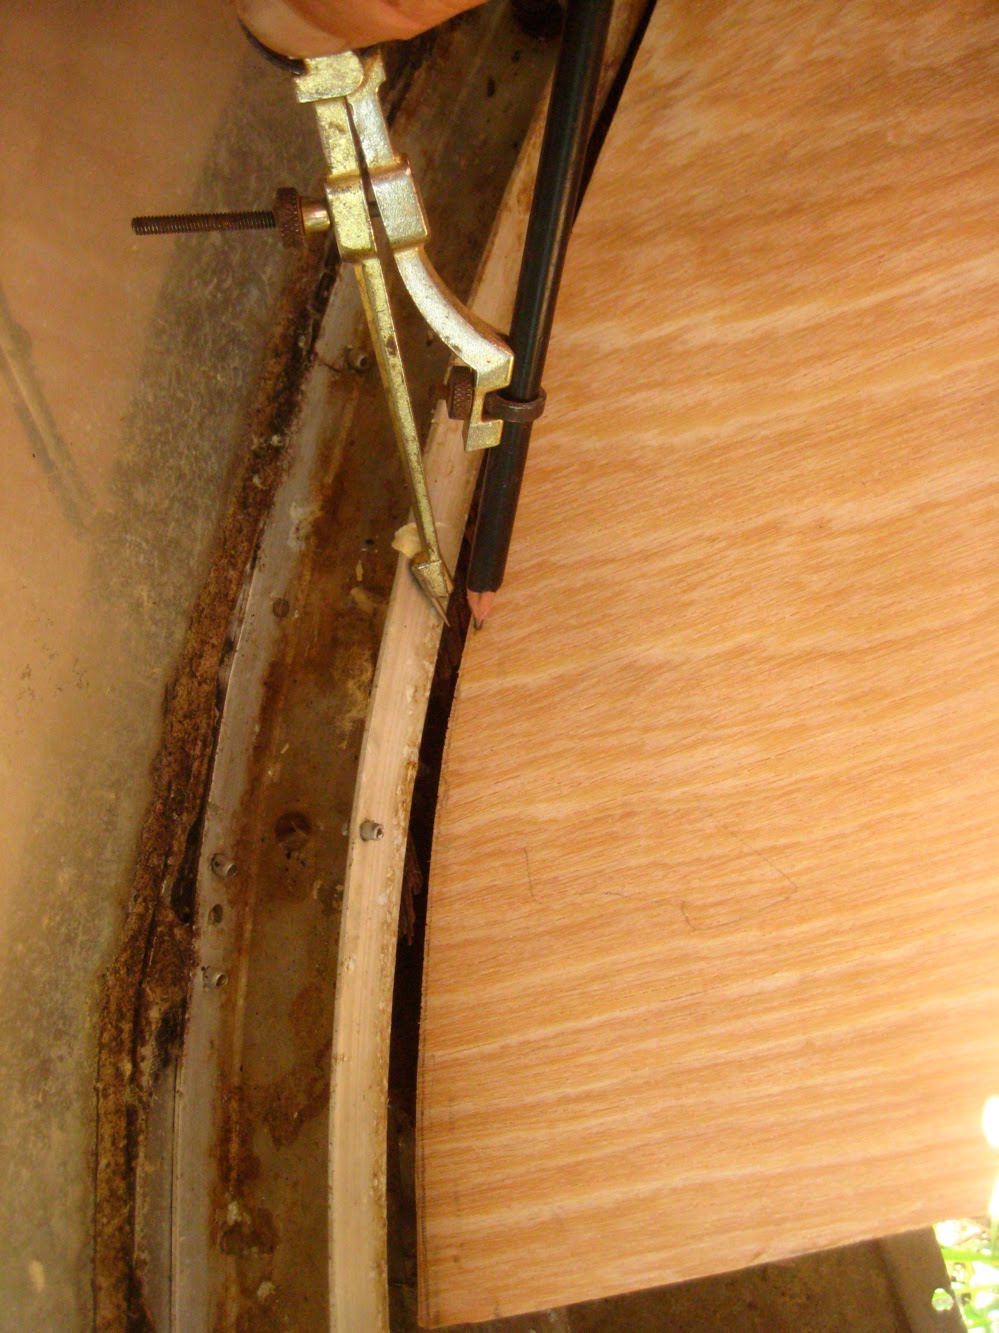
I used my scribes to mark out the 5 mm Luan I am using. I draw the curve and use a jig saw to cut the waste off. Fine adjustments to the line are made using a belt sander.


And that is how to templates the curve. These pieces will be glued together mapping out the entire inside edge of the channel all the way around the trailer.


By creating this pattern of the curves and all the cutouts, I can put this down on my new floor and know exactly where the channel should be. I will do the entire perimeter of the trailer this way and know with confidence I have it all correct.


My next post will not be until the next taping of The VAP, in two weeks. Between now and then you will have to wonder if I have lifted the shell yet, if the frame has been fixed and painted. You will need to wonder about grey water tanks, and black tanks or the lack of actually needing them. No black tank? What? You will also be wondering if Steve flew back in for another week of work. Please stay tuned for the next segment. And please help support The VAP by listening, calling in your questions, and making a periodic donation so the Boys can keep it going.

Wednesday, August 18, 2010


That song always seems to come on the radio in the wee hours of a trailer recovery. It comes blaring out of radio late in the night, in between the Jesus stations vying for my salvation and BBC World News that runs in a continuous loop through out the night on the lower end of the radio dial. It is a fitting song, for I left Baltimore at 1am heading to pick up a trailer I had bought a year ago. This is yet another free trailer available to anyone willing to have her restored.


The Smoky Mountains are in North Carolina, but I was far from them. The clouds were totally engulfing the road as I went through Fancy Gap and down into North Carolina.


I arrived to a very nice assortment of vintage Airstreams and Avions. I had bought this little 54 Safari over a year ago and actually never set eyes on her. Kevin was kind enough to store her for me till I could get down to fetch her. After a year, I thought I had better just make the time.


I stopped in a rest area after about a half hour and the bearings were warm, but not hot. I pushed on toward Maryland.


She towed like an absolute dream. Straight as an arrow and never a single sound from the rear.


Those three windows and thirteen panels are just such an eye catcher.


I have to say at about 925 miles I hit a serious wall. I had been drinking copious amounts of coffee, I had a Mountain Dew or two, and even a Five Hour Energy. I was just feeling zapped by such a long drive. I was about to pull over to take a nap, but then I crossed the Shenandoah River and I caught a fourth wind.


When I crossed the Potomac, I actually felt revived. I knew I had less than an hour to go.


Just as the sun was going down I pulled off the highway and a few minutes later I pulled into the yard. 21 hours on the road, a few miles shy of 1000, and lots of coffee later I was home. A very long day for sure, for "it was an early morning yesterday... I was up before the dawn... I really have enjoyed my stay... but I must be moving on..."

I promise some good detail shots of this new addition to the harem soon. It was rainy today and I do not want her to look gloomy in the photos.
The current project in the shop is kind of under wraps. The plan is to revel the project in a very special way. You will all just have to remain patient till I am able start talking about it. It will be worth the wait I promise.

Sunday, August 15, 2010

Shift Change to the Willows


There comes a time when all projects come to an end. Today was Rosie's day.


I get rather attached to my jobs as I do them. However, there is also a certain amount of relief to see how happy the owners are to see their long awaited projects come back to them. Rosie is just beginning the trip, for now her entire interior needs to be put back. The plumbing, the electrical, the finished surfaces all need to be done. Lots of little bites eats an elephant sandwich. Just remember that as you go Elly.


See you down the road Rosie. Thank's for stopping by...


One of the good things about a project leaving is I get to start a new one. Look at that sad looking 1964 Sovereign of the Road. Jalousie windows trying to fall out, dent in the end cap. I bet the floor is all rotted out that was nailed down OVER the rotten original floor. Probably even has sagged out axles. Bet it doesn't leak though.
I would tell you more about this project, but at this time, I cannot... I do not want to spoil the surprise, so just please wait patiently till I can say more.

Tuesday, August 10, 2010

Migrant Worker

Rosie is standing very proud these days. All of her structural work is complete at this point. She has had so much done over the past couple of weeks that it has been a total whirl wind. Only a few minor tasks are still to be done before her owner comes pick her up to take over the rest of the work.


In order to reunite the shell and the chassis a lot of riveting needed to be done. Riveting requires two people to do it correctly. Frank's Trailer Works has hired it's first employee...


He is a migrant worker of sorts, for Steve has come on board to help on a part time basis. I flew him in from Wisconsin for a 6 day stretch. His attention to detail is beyond expectation and he does only quality work. The fit is perfect for me. Steve will be coming again soon to work on the next project.


I got most of all the body drilled and set for rivets. I wanted the time Steve was here to be as productive as possible.


Inca Plastics came through on an exact match for the black tank. They even put sensors in the end for me. It is pretty cool that the company that manufactured the original was still around to build an exact match. The installation of this tank is one of my loose ends.


An area in the original design that I have issues with is the wheel wells. The entire system is plastic and there is a huge void where the wheel well cutout, and the skin, and the channel, and the floor all come together. I worry that water from the road could easily get into this area. There was nothing really tying the exterior skin to the plastic pans or to keep them rigid. I decided to make an "improvement." I got out some sheet aluminum and cut out some shapes.


Did some bending and some folding


And some drilling and some clecoing. All to be followed by some riveting.


And now all that area is stout as can be. No gaps for water to get in or anywhere near the the plywood. A very good "improvement " if you ask me. You can also see the water heater hanging proudly in the opening I added mini ribs to. The fit was perfect as if it was made for it.


We shot a ton of solid rivets. Thousands for sure. Steve bucked every one of them. We also replaced a good number of rivets. There is nothing that I loath more than re doing other people's shoddy repairs.


At some point two end cap segments had been replaced using "the Airstream approved" overlaid, panel replacement done from the outside using Olympic rivets*. Well, it might be allowed, but it sucks and is a failure, not an "improvement" at all. Here you see conclusive proof that Olympic rivets leak. Actually 12 in a row leaked, there were many others scattered in other areas also.


Two of the rear segments had been replaced in the past. Steve and I worked together drilling out every other rivet, using the remaining ones to hold things for us. I might point out that the sun is blazing down on us and the thermometer on the shop is reading 98 when this photo was taken. Rosie's skin is so hot that one could barely touch it.


We leap frogged the new solid rivets in and then reversed the process until all the bad rivets were gone. See how easily you can see the center of the Olympic? Well, so can water. The sheets are also not as tight together as they could be with the Olympics. See how where every solid rivet is, the sheets are so much closer together.


This is up top on the two replaced segments. It is a shame to see this big dent, but fortunately it cannot be seen from the ground. It looks as if someone slammed a chain down on the roof with tremendous force. There actually appears to be dents like links in a chain. The seams in this area are not perfect, but they are drastically improved over what we started with. Hopefully the next rain will reveal that the leaks in this area are gone.


Having Steve is a huge asset. He is willing to work on any task I need him to. He approaches everything with great pride and the results show. He does not hesitate on getting down on the ground and crawling under or going up on the roof. For a first employee, even if it is part time and he is a migrant worker, I could not had gotten more lucky.


So here she sits. Looking ready to hit the road again. I will have a wrap up post in a couple of days once I finish the little list of minor tasks.


*"the Airstream approved"overlaid, panel replacement done from the outside using Olympic rivets.
This is just a descriptive name I call this process. It is not necessarily what Airstream Service calls it. The name came from various heated discussions on the AirForums. New skins are mounted over the damaged ones and riveted using Olympic rivets from the outside. This saves on removing the interior to properly install buck rivets.
Airstream Service does however, approve of the use of Olympic rivets for repairs even structural ones.
Frank's Trailer Works does not approve of the use of Olympic rivets for anything except installing trim or accessories. When used, copious amounts of sealant are used. Future use of these rivets is in serious question right now and all previous work done using them is being monitored closely.