Thursday, October 28, 2010

Full Throttle Ahead

If you are not aware, I am also documenting this project on the Vintage Airstream Podcast. You can hear some explanation that might add to what you read here. Go back to episode #120 to find the beginning.

Some days seem to go nowhere fast and others plow through full throttle. There are so many details to deal with before I could drop the shell back down.


An area of concern for me was where the frame rails and the plywood meet. There is this gap in the belly wrap. This is a serious weak spot in the amour. At all four spots where the frame meets the body this situation exists.


I made this plate to protect that spot. The back side is filled with Vulkem and there is no water going back under there now.


I am always blown away by how much supplies and tools accumulate doing the most simple of tasks. This is all associated with wiring the brakes and the emergency break away system.


I went with an independent break away system, not dependent on the trailer batteries. The unit has a battery and charger working off the umbilical cord. In the event the trailer falls off the ball, this will set the brakes fast to stop the trailer from rolling.


Eventually the time came to roll the chassis back under. I was fortunate to have the help of Ace Goldberg for this task. Ace came on down from Pittsburgh and gave me two solid days. He did an awesome job.


We got the chassis as close as possible before lowering the shell down.


Nice and slow. Push here, pull there. Wiggle, wiggle wiggle...


We got the front plate lined up and just started filling holes. With Ace's awesome help we managed to get the key areas riveted around the belt line . The only ones we did not do around the belt line, were where panels are being replaced. Ace was a huge help to me. Just like Steve, I wish he lived closer so we could work together more often.


Bruce, my client, came for two days. He stayed in Anna, our 62 Overlander, and we spent the time working out many of the details associated with layout. We sat and communed with the trailer a good deal. The layout will be very functional. More of that in the future. For now, the main focus is structure.


Here is an aspect of the project I thought the input of some of you readers might come in handy with this. At some point in the past this trailer was hit. The rib to the left of the jalousies window was replaced. When things were bucked back together, the left side of the window was bucked in 1/2" lower than the right side. Should I correct this? What would you do if you were me? Most people would never pick up on this down hill slope. I bothers me tremendously.


Here you can see the different sized ribs used to replace the damaged one. One was added under the original and a second was used as a splint. If it were you, would you correct this slanting jalousie. The window functions perfectly. The rivet lines all looks good from the outside, but what would you do. Reader votes solves my decision.


At some point this segment was replaced also. I think all this repair work was done at the factory or by an Airstream service center. It was done very well.


My next step was to launch into body work. I need to create a weather tight shell with all functioning windows and hatches. I also need to move a window, add a window, and install the second door, creating the one and only 1964 double door.


I am stripping the exterior of everything. All vent pipe penetrations are coming off and most are being patched over. The awning rail is being replaced with new straight stock so that also is being stripped. Look at all that dirt build up behind it. If it protrudes, it is getting removed.


We are going with three new Fantastic Fans up here. All three will have rain sensors in them. Bruce is forgoing air conditioning, so the Fantastic Fans will need to be able to move a good deal of air.


I also removed all the glass from the jalousie windows. All the glass will be new in every window throughout.


Even the porch light will be replaced. Ahhh.... BEAUTIFUL FALL DAY IN MARYLAND!!!!!


Another discovery was how the wheel wells shape had been raise up to give more tire changing clearance. I always thought it a weird shape, but had never studied it closely. This photo is a great "BEFORE" photo. Ready to see a big change? Seriously, are you ready?


Whoa... Where did that third safari style window come from? Nice look if you ask me. Much better balance with that one there. See the 12 foot panel under those three windows? It is getting replaced. So is the same one on the other side for that matter.


Bruce wanted a lot of air and light in his trailer. I made that desire come true for sure. With the curb side changes you will see in the next post, that dream is going to be an ELEVEN.


Now that is a nice set of windows. When that big crease is gone and the wheel wells are cut out this side will look tremendous. I am very proud of the direction this is heading.

For my next post, I should have the second door installed and the jalousie window next to it. By the next post, this Sovereign will be a double door for sure. Hopefully the next few weeks will be as productive as these were. Thanks for reading and listening. Send me your opinions on the slanted jalousie window....

Monday, October 11, 2010

Sneaking One In


I have been doing a VAP exclusive with my current project, but I really felt the need to sneak this post in. FTW is moving into a rather large and somewhat spartan space. There is no office or break room, so I am bringing one in.


Here is the FTW office/ break room. She is a 1960 Fan. Aluminum skin, but not riveted like an Airstream. I know many of you think I am an Airstream dude(my nickname at the Port of Baltimore. A number of Port workers call me that as if they know me. I only know Diane. She is the nice lady that makes my paper work official. There is very little I would not do to keep her happy. My wife even knows, if the call comes, I might have to take one for the team) however I have a strong affection for many other brands. While I am being honest and direct, Airstream, well, how to phrase this kindly,... are not "THE BEST" as many think. There are some much nicer and much better built trailers out there. I just happen to like Airstreams the best, and have only worked on them so far. Moving on.


This little Fan is not however better built than an Airstream. It is a stick built, screw, nail, and staple trailer. Quality and longevity were not the motivation for it's construction, use was. Big bang for the buck. Functionality over design.


So many trailers are built in Indiana. Does anyone know why? I realize you think I have all the answers, but I do not know the correct answer to this one.


Wakarusa Indiana. Wakarusa is right next door to Elkhart. Elkhart seems to be the epicenter of trailer fabrication. Why?


I really dig this aluminum siding. The Hehr Standard windows are a big hit with me too. The steel screws, not so hot on those.


Kind of a nice pedunka dunk...


That is the smallest Herh window I have ever seen. 6" tall including the frame.


Nice big window in the door.


A small but efficient galley. A good place to make coffee, heat up some soup. Heck with a nice cast iron griddle, I could fix anything on that stove top Princess. Hopefully the Dometic works so that I can keep some Natty Boh cold. For when clients and visitors come, not for me, I would never have a cold one at the end of a hard day.


A nice spot to eat lunch, go over details, shop for parts...


Cold water washing of dishes. Might need a grey tank for that. The space does have hot and cold water. Maybe I can pipe it in..


And if I get too tired, a place to lay my head.


If either of my daughters are rendered into indentured servitude to me, I have a bunk for them.


I will have Saintly protection. Is Saint Anne the patron Saint of trailer restorers?


The Fan has or has had a few leaks. They all leak ya know.


If the power ever goes out I can fire up the Humphry lamp and keep right on going.

Hope you enjoyed the tour of my soon to be office trailer. My next post will be back on track with the 64 double door.

Thursday, October 7, 2010

Back on Her Own Four Feet(Wheels, but that does not sound as catchy)

The past two weeks have not seen as much production as I would have cared for. I am not going to make excuses, but a major reason for slow forward progress has been the weather. Fall is here now and with it comes many rainy days. Lost days has lead me to find a solution. The solution is leasing a commercial space. Finding the right space, negotiating a lease, and lining up the required trades to make the space fully functional has also taken me away from working on the Double Door. As of December 1 Frank's Trailer Works will have a large facility so that there will no longer be lost days due to the weather.
I have not been a total slacker however. Things have happened that were highly productive. Bruce came for a day and a half visit. We spent a good deal of time doing a conceptual layout that we both feel will work very well for his needs. Both of us made some compromises in our visions so that we can create a highly functional trailer.


Something that has caused slight delays was the waiting on axles. The time delay ultimately falls on me for not creating enough lead time. I ordered these Axis axles through Colin Hyde Trailer Restorations. Colin was extremely helpful in ordering and held my hand through the whole thing. You do have to do some measuring, careful measuring I might add. It is not difficult and he will walk you right through it. My total came rather quickly via email as to the cost with shipping. I simply mailed off a check and a few days later received a build date of the following week. From the time Colin received my check to the delivery was exactly three weeks. The axles came well protected on a pallet. All hardware was included with the order. I only had to acquire the shocks and that was very easy.


The chassis is now back on the ground sitting on her tires. The wires you see are for the brakes. Once the belly is installed they will all drop down at the hub through a rubber grommet.


Another delay has been the grey water tank. The manufacturer punched in the wrong model number and sent me a 53 gallon tank instead of the 30 gallon, I not only ordered, but altered the frame to accommodate. I was held up many days waiting for the wrong tank to come and even more days for the correct one to show up. They finally got it right, and the tank went into the frame as if it was made for it. Oh, yeah, it was made for it.


From the side of the tank I ran the drain line forward for the shower. The entire Bathroom will be a wet bath configuration. More details on all of this will come forth in the near future.


I also drilled into the top of the tank for the feed from the kitchen. This will also serve as the vent for the tank.


Originally all the umbilical wires connected to the trailer wires in the belly. I hate laying on my back messing with trouble shooting wires, so I eliminated the need to do that by bringing all the wires up in the front. In this area we will have a wiring compartment. Trouble shooting will be very easy.
All of these things needed to take place before I can install the belly pan. The installation of the belly pan began this afternoon but did not get to point that much can be said about it. Perhaps in my next post, this will be highlighted.
By next post, I feel confident that the shell will be back into place. Please stay tuned...


Thursday, September 23, 2010

More Than Meets the Eye


I wish there was more to see in these photos, but a good deal really has taken place over the past two weeks.


When I last posted we had a primed frame. Everything from that point on is all reconstruction. She is now being put back together and it feels great. I will highlight some of the things that got us to this point. The exposed areas were painted FTW grey. I prewired all the brake lines through the frame first. The brake wiring included the runs for the break away safety switch to the tongue. A new umbilical cord was also installed while it was easy to work from above.


Marine grade plywood was bolted down to the frame and the outside shape was cut using the template I fabricated during deconstruction. The template assured me everything would line up perfectly. The new wheel wells were also installed and sealed to the frame. I reused the curved extrusion sections of "C" channel for the front and rear curves, but all straight sections were fabricated using new material. There was just no reason to reuse something that was beat up and full of holes. I can now drill new holes into virgin materials when riveting the shell in place.


2 inch of polyisocyanurate foam insulation was carefully cut and glued to the underside of the plywood floor. This gives a full 12R of insulation down there. Mice are not very fond of it as nesting and it does not absorb water. I have used this insulation a number of times now. I would like to go ahead and install the belly pans which have also been fabricated using the originals as templates. The hold up is waiting on the grey water tank. It needs to go in and all the lines run to it before I button it all up down there. It is very important to have all that complete before it is buttoned up.


I also could really stand to get the new axles mounted under these new wheel wells. Axis built them on the 16th so hopefully they are on a truck heading towards me. The tank and waste lines are more important than axles but having things on hand makes me most comfortable for work flow.

I know none of this is very exciting to see, but it is all steps forward toward reuniting the shell and chassis. Hopefully by next posting the belly has been installed and the shell has joined back where it should be. That should offer some visual interest.

Tuesday, September 7, 2010

Shell Off!!!!!

The past two weeks have been tremendous with Steve coming into town for six of those days. I will go through some of what has happened since my last post...

After my last shell off I decided to go about things a little differently. I had seen how a friend in the UK lifted the shell from above instead of from below. Doing the lifting from below is easy, but the lowering it back down is rather precarious. I adopted Chris's method, for it offers a good deal of safety and ease. Since I do not have a gantry in an old warehouse to use, I needed to either buy one or build my own. I went with the "do it yourself, build your own" gantry.


The gantry I constructed is basically two sets of saw horses. They are giant saw horses though, at 12 feet high. I should be able to use these over and over for many lifts to come. They could actually lift the entire trailer I think.


I made sure both sides of the gantry were level with each other before connecting the dead fall chain to a beam below the front and back vents. The shell, once released, just dangles in the air. It is amazing how little weight these shells have in their raw form.


Literally the pull of two fingers sent it right up in the air. There are a lot of rivets to find and shear before it can happen though. The term blind rivet is no exaggeration, many are so obscure you would never think them to be there. Once they are all cut, it just lifts up very easily.


We just rolled the entire chassis right out from under her. I will tell you, seeing the shell hanging there was a very unusual sight.


Getting the shell down on the ground quickly was important. The slightest breeze caused it to sway back and forth like the sail on a wind chime. Fortunately, Steve held it still till we could lower it down with the chain fall. I think this method of lifting and lowering worked very well. It was safe and very efficient. The next major task was to take the belly pan off.


Folks, the belly pan on any vintage Airstream is a nasty ugly place. This may look extra dirty, this may look very unusual, but this is exactly what I find every single time. Even in those cute, well taken care of units, this is what it looks like. It is best to remain ignorant in my opinion, and not look in.


Once the belly was down and cleaned off it did not look as bad. It will only serve as templates though, for just about every out rigger has sawn through. I think a previous owner had an affection for running over large objects also, for it has many major dents.


Here is a good indication of the condition of the floor. You can see the plywood that was screwed down over the rotting original. A few nails were also used for good measures.


For real secure flooring you might want to use a Hilti gun (sarcasm for those unable to recognize it). For those not familiar with a Hilti gun, it uses a 22 caliber load to literally shoot a nail. This tool is typically used to shoot(yes, shoot BANG) a nail into concrete or steel in commercial applications. You can buy them at your local orange or blue box, but you are supposed to be certified to use them. There have been many cases of this tool being used incorrectly and the nail going through the intended location and into an innocent victim. I am continuously baffled by what some people do. A HILTI GUN IS NOT AN AIRSTREAM RESTORATION TOOL. Okay, moving on.


The wheel wells look fairly good in this photo but they are very torn up at the seams. There are many holes where they have rusted through from the outside in. Like the belly pans, the originals will serve as patterns for new ones.


A big surprise was the condition of the frame. Looking at the floor, I would have guessed major damage. I told Bruce to cross his fingers as to the state of the frame and he must have crossed all his fingers and all his toes. There were four quarter sized holes and nothing else. No cross members or outriggers needing replacement. We were able to just focus on cleaning it up and make alterations for the grey water system, install the second set of steps, and repair the bumper.


Sometimes in a restoration parts can only be found by taking them from another trailer. Originally this 1960 Tradewind was bought to use the door for this project. Unfortunately, the door decided it liked Tennessee and jumped off along the road. The overall condition is very poor, so it really is good for parts only. All you purists calm down, I am being respectful. Many trailers will benefit from the sacrifice of this one.


Steve cut the entire step assembly out of the Tradewind and welded it onto the Sovereign frame. He made it fit and operate perfectly. I was very impressed with how he made this happen. It took a little effort, but it really paid off.


Another thing we took off of the Tradewind was the bumper. The Sovereign's was beat to hell. We contemplated trying to straighten it out, but it always would have looked imperfect. The one from the Tradewind even had a spare tire mount on it. A huge bonus if you ask me.


A bunch of you are getting all worked up now by this. I know, some of you are thinking that there should not be all that weight hanging on the bumper, but I have thought this through a great deal. We are loosing the rear bathroom. There was a rather large black tank back here and that is gone along with all the other stuff. We observed the frame when the wheel was put on and the frame did not move. The frame is very flexible and rather weak by itself. I feel strongly that the spare tire will be no problem at all. The reenforcement won't hurt either. Mr Byam took trailers through Africa in 1959 with two tires hanging off the back. It will be all good.


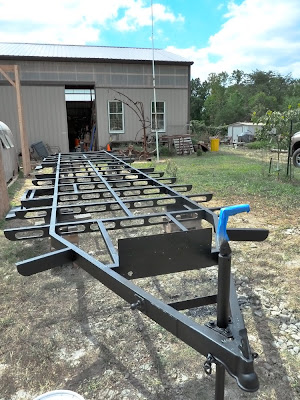
Here is the frame all cleaned up and ready for primer...


I love the way that second step looks. I am very excited to see what the rear door will look like once the shell is put back. This project has me very excited in general.


So the next step is treating the frame to minimize the possibility of rusting out in the future. Being always on the hunt for new technology to improve the process I went to my local paint store. I am not going to mention names, but this company is known world wide. I have always been very happy with their products and know that the real bulk of their business is industrial coatings. I let the fella there talk me into an oil based product designed for metal structures such as oil wells and bridges. The product went on very well and flowed through my cup gun perfectly. When I left for the day I was very pleased with the results.


Unfortunately 14 hours later I found this to be the results. Showing up for work and seeing this was like a swift kick to the groan. It said boldly on the label "CONTAINS RUST INHIBITORS"... Uhm, was that a typo? Did they mean to say "CONTAINS RAPID ACTION RUST INCUBATORS" Now I have been thrust into this position before where I try something and it fails. My failures are not the responsibility of my client, they are mine. So I clocked out, got out the wire brush and the sand blaster, and removed all the primer. Next I used a product I know works. If Eastwood ever becomes a sponsor, I will mention their name.


Black is a more fitting frame color anyhow. I learned a great deal during this process. Colin Hyde actually gave me a lead on something to try out the next time around. For now, this is a proven rust treatment that I know works well. I just need to top coat the parts you will see with FTW grey and we will be set. Some might view this as a lost day of work, but for me it was a good learning experience. Learning is priceless ya know. That is unless it is college learning, that is very costly. Just ask my neighbor who's daughter started at BU this year.


Next post: New floor, new wheel wells, new "C" channel, grey tank, wiring for the brakes, new belly pan, and most likely a reuniting of chassis and shell.